Roasting with the Kaffelogic Nano 7e
Kaffelogic Nano 7e is a very easy-to-use coffee roasting machine that allows you to experiment and find the perfect roast for your own taste thanks to the small quantities and fine adjustment options. Here are my tips.

Simple roasting
Roasting with the Kaffelogic Nano 7e is very simple. The machine is supplied with a number of ready-made profiles that allow you to roast a good coffee without any prior knowledge. Each roasting profile can be set in 60 levels from very light to very dark. So all you have to do is the following:
- Pour in 90 - 120g green coffee
- Select roasting profile
- Select roasting level (colour level)
- Press start
We will now go into more detail on how to find the right profile and the right level.
What is important when roasting
Coffee roasting is presented to the outside world as a very complicated process, and anyone looking for information on the internet will be overwhelmed at best.
The fact is, however, that there are some (obvious and unspectacular) factors in coffee roasting that have such a clear effect on the flavour that everyone can taste it. And there are many factors that even very experienced roasters can barely taste in blind tastings - and yet it is precisely these barely relevant factors that are often emphasised. You shouldn't let this confuse you, because the only thing that matters is that the coffee tastes good.
And here we come to one last important preliminary remark - flavour preferences are extremely different from person to person, so you should really pay attention to your personal sensory perception and concentrate on what YOU like.
Work your way step by step through the factors that have a relevant influence on flavour - from big to small:
Which roasting profile for which coffee
The density of the green coffee used has the greatest influence on the choice of roasting profile.
Kaffelogic tries to take this into account by sorting the profiles according to the growing height of the coffee. However, the growing height is only one of the factors that influence the density, so I would recommend that you measure the density of the coffees in future and select the profile accordingly. You can find the density of our green coffees directly in the description https://roastrebels.com/en/green-coffee
Otherwise, it's really easy: take a container where you know the volume (e.g. 250ml up to the rim). Tare it on the scales and overfill it with green coffee. Remove the excess coffee from the top. Measure the weight and work out how many grams it would be per litre. e.g. 175g of green coffee in a 250ml container would be 700 grams per litre.
- 0 - 1200m REST
Coffees with a density of up to 700g / litre - 1200 - 1500m REST
Coffees with a density of 700 to 725 g / litre - 1500 - 2000m REST
Coffees with density 725 to 750 g / Lt - 2000 - 2700m REST
Coffees with density from 750 g / Lt - Cupping, Robusta, Decaf and Super Dark
are self-explanatory profiles - RTD profiles
see below for more information
Which roasting level
As already mentioned, the colour of the roasted coffee has a significant influence on the taste of the coffee. It is therefore important to find the roast colour that best suits your taste. Kaffelogic makes this very easy with the so-called roast levels.
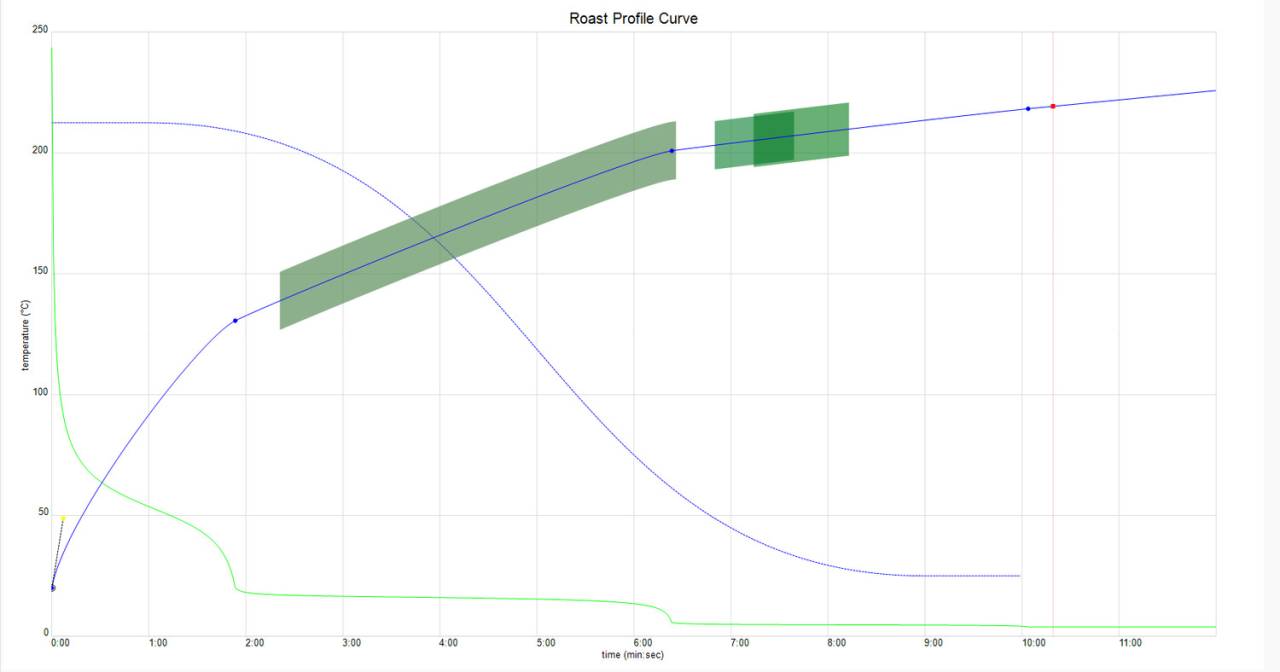
Kaffelogic roasts the coffee along a predefined curve. The roast level is the point on the curve at which the roasting ends. It is therefore a function of the time and energy that has flowed into the bean and correlates directly with the colour of the roasted coffee. It is therefore a very simple parameter for trying out different degrees of roasting or roast colours.
Bracketing
When photography was still analogue, the so-called bracketing technique was used - a picture was taken three times: once darker, once medium and once brighter. The pictures were then compared and the one that was the most beautiful was taken again in a series with finer gradations.
I also recommend this for roasting with the Nano 7, for example
- 3 roasts of a coffee with the same profile:
Level 2 / Level 3 / Level 4 - Assuming Level 2 tastes best to you, but is not yet perfect, then make two more roasts with the same profile and compare:
Level 1.8 / Level 2 / Level 2.2. - Keep doing this until you have found the perfect setting for you.
Light Roasts
The profiles supplied by Kaffelogic tend to be quite long for the range of the machine, at around 9:30 to 12:30 minutes each. The profiles are very suitable for medium and dark roast levels and taste very good to most people.
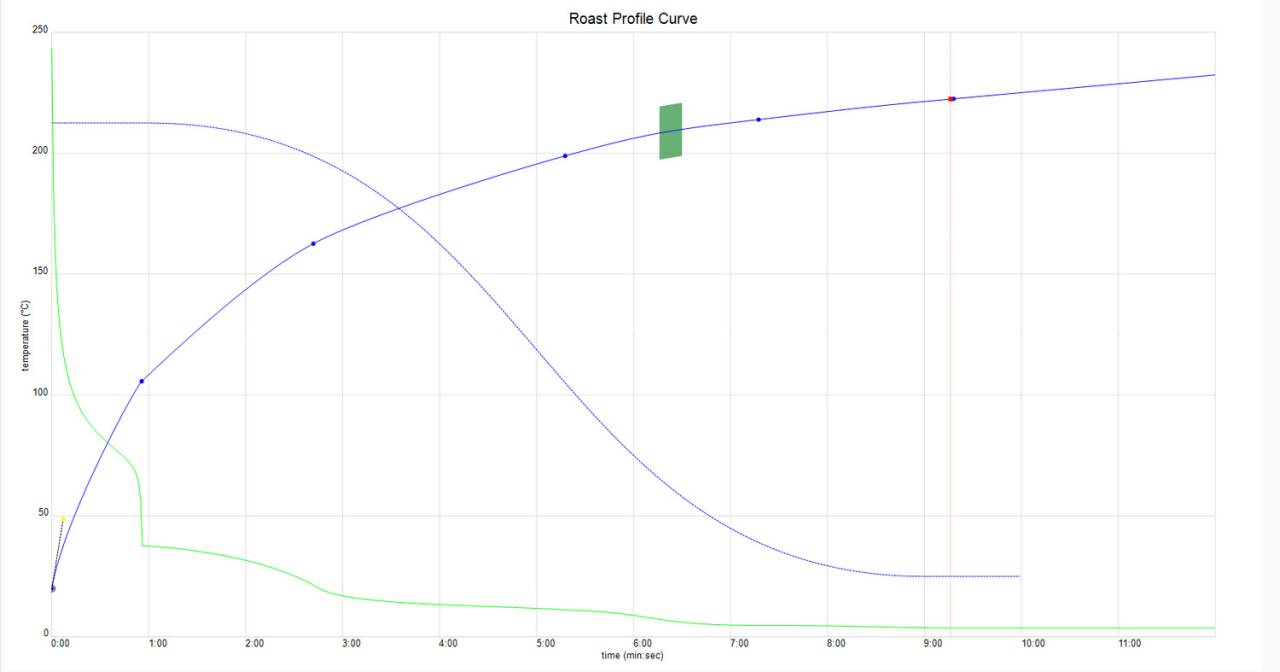
However, if you like light-coloured filter roasts, then these profiles are too long and you should roast a little faster. Here, for example, is the roast profile of World Brewers Cup champion Carlos Medina - his roast took just 7:30 minutes: https://kaffelogic.com/competitors-page/wbrc-chile-2023
You have the following options for light-coloured roasts:
- Choose one of the standard profiles that is designed for very dense beans and select a light roast level.
- Select the cupping profile
- Edit a profile in Kaffelogic Studio and make it shorter and with a steeper curve.
- Here you will also find a collection of roasting profiles that I like to use for lighter roasts. Partly from the Community Forum, partly from championship participants. Why don't you try them out? You can download them here in a ZIP file: Kaffelogic-Profile
Ready to Drink Profile
It turns out that with pure fluid-bed / hot-air roasters such as the Kaffelogic Nano 7, the coffees are outgassed and ready to drink much faster. Why exactly is not yet clear. One hypothesis is that the structure of the bean closes on the outside when the beans hit a pre-heated roasting drum and therefore less CO2 can diffuse out of the bean in the drum roaster during the roasting process and therefore the CO2 content is higher after roasting. However, as the Kaffelogic Nano 7 builds up the heat at room temperature, more CO2 can escape from the bean during the heat build-up and therefore there is less CO2 in the roasted bean at the end.
In any case, the Kaffelogic team has been able to develop roasting profiles that taste significantly better straight from the roaster than in conventional roasting and also makes these roasting profiles available with the RTD labelling, i.e:
- 0 - 1200m RTD
- 1200 - 1500m RTD
- 1500 - 2000m RTD
- 2000 - 2700m RTD
I use these profiles when I have no more coffee at home and am always surprised at how well RTD roasting works. Give it a try, I'm curious to see how it tastes.
1500 - 2000 REST Profil
1500 - 2000 RTD Profil